Are you tired of paying premium prices for already peeled and deveined shrimp at the seafood counter? Do the thought of tackling those armor-like shells and mysterious "veins" leave you feeling intimidated? You're not alone! Many home cooks shy away from preparing whole shrimp, believing it's a complicated task best left to professional chefs or those lucky enough to live by the coast. But what if we told you it's one of those kitchen skills that looks much trickier than it actually is?
Preparing fresh shrimp from scratch is a culinary game-changer. Not only does it offer significant cost savings, but it also ensures you're working with the freshest possible product, leading to superior flavor and texture in your dishes. In this comprehensive guide, we'll demystify the process, breaking down exactly how to peel and devein shrimp like a seasoned pro. Get ready to embrace confidence in your kitchen and elevate your seafood cooking to new heights!
Why Bother Peeling and Deveining Shrimp? The Truth About That "Vein"
Before we dive into the "how," let's address the crucial "why." You might have heard the old adage that leaving the shell on shrimp enhances their flavor. While it's true that shells can impart a deeper flavor to cooking liquid (making them excellent for stocks!), eating shrimp with the shell on means you're often consuming more than just the sweet meat.
The dark, sometimes prominent, string running along the back of the shrimp is not a "vein" in the circulatory sense. It is, in fact, the shrimp's digestive tract, equivalent to its colon. And just like any digestive system, it contains everything the shrimp has eaten – which can include sand, grit, and other undesirable detritus from its environment. While consuming it isn't harmful, it can certainly be off-putting, gritty, and diminish the overall taste and enjoyment of your meal.
Removing the shell and deveining ensures a cleaner, more pleasant eating experience. It allows the flavors of your seasonings and marinades to truly penetrate the delicate shrimp meat, rather than being masked by potential grit or an unpleasant texture. So, while it takes a few extra minutes, it’s a vital step for culinary hygiene and a truly delicious outcome. For a deeper dive into this topic, explore The Essential Guide: Why You Must Peel and Devein Shrimp.
Your Essential Tools for Shrimp Prep
One of the beauties of peeling and deveining shrimp is that you don't need an arsenal of specialized gadgets. Most of what you need is likely already in your kitchen:
- A Small, Sharp Knife: A paring knife is ideal, but any small, sharp utility knife will do the trick. Precision is key for slicing the back of the shrimp.
- Cutting Board: A stable surface to work on.
- Two Bowls: One for the discarded shells and heads, and another for the cleaned shrimp. This keeps your workspace tidy.
- Colander: For a final rinse under cold water.
- Optional - Shrimp Deveiner Tool: While not strictly necessary, a specialized shrimp deveiner can be handy, especially if you're processing large quantities. It's designed to make a shallow cut and extract the vein efficiently.
- Optional - Kitchen Scissors: Some people find a sharp pair of kitchen scissors easier for cutting along the back of the shrimp, particularly for larger varieties.
- Optional - Gloves: If you're sensitive to seafood or prefer to keep your hands clean, latex or nitrile gloves can be useful.
Step-by-Step Guide: How to Peel and Devein Shrimp Like a Pro
Now that you understand the "why" and have your tools ready, let's get hands-on. Remember, practice makes perfect, and you'll get faster with each batch!
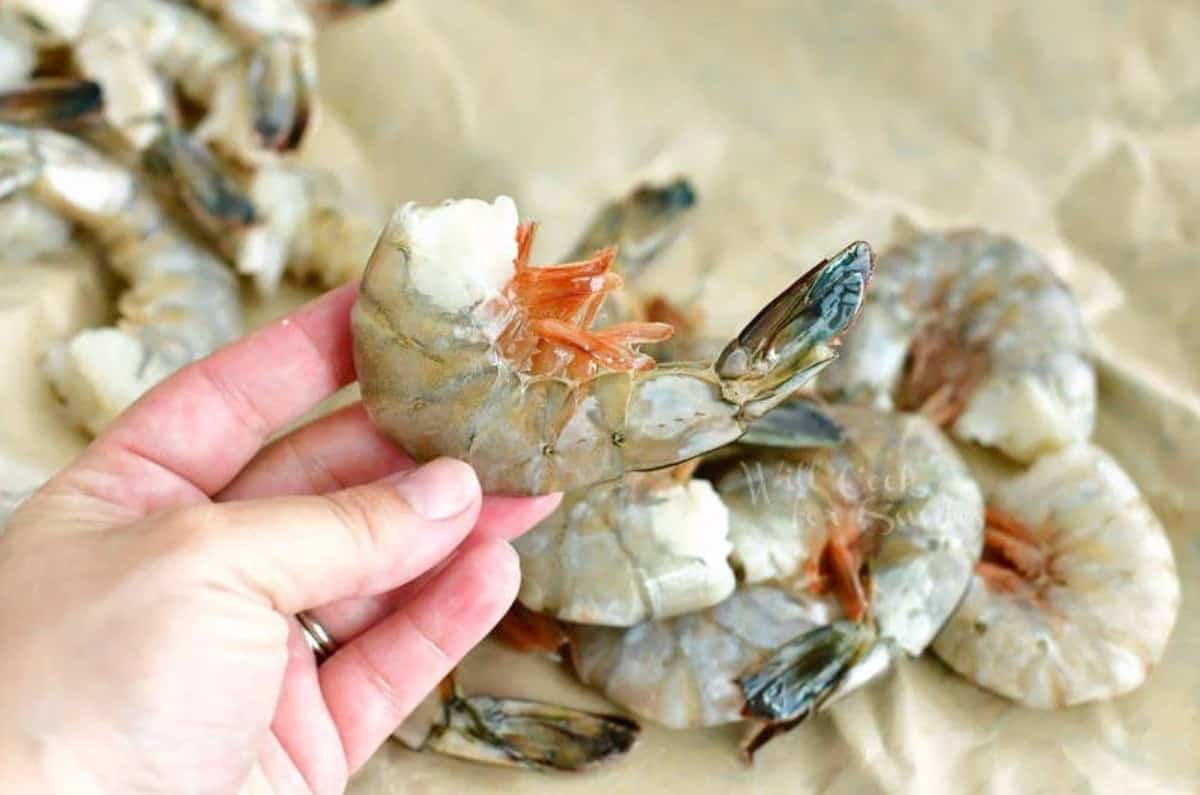
Removing the Head (If Present)
If your shrimp still have their heads attached, don't fret. This is the easiest part. Simply hold the shrimp body in one hand and twist off the head with the other. It should come off cleanly with minimal effort. Discard the heads into your designated discard bowl, or save them to make a flavorful seafood stock.
Peeling the Shell with Ease
This is where the real "peeling" begins.
- Start from the Underside: Begin by locating the tiny legs on the underside of the shrimp. This is often the weakest point of the shell.
- Crack and Pull: Gently start pulling off the shell from the underside, near the legs. You'll feel a slight crack as the shell detaches from the meat. Work your way around the shrimp, pulling the shell segments away. Don't be afraid to be assertive, especially with larger shrimp which have tougher shells.
- Tail On or Off? As you reach the tail, you have a choice.
- Tail On: Leaving the tail on often makes for a beautiful presentation, especially in dishes like shrimp scampi or grilled shrimp. It also provides a convenient "handle" for eating.
- Tail Off: Removing the tail makes the shrimp much easier to eat, particularly in curries, stir-fries, or pasta dishes where you don't want to pick out shells.
- Removing the Tail (If Desired): If you opt to remove the tail, simply pinch the very end of the tail section with your fingers and slide it off. It should detach cleanly from the last piece of meat.
Revealing and Removing the Vein
This is the crucial step for hygiene and improved flavor.
- Locate the Back: Hold the shrimp with its curved back facing up.
- Gentle Incision: Using your small, sharp knife, very gently slice along the top of the shrimp's back, from near the head end down to the tail. The key is to cut just deep enough to break through the thin layer of skin, exposing the "vein" (digestive tract) beneath. You don't want to cut deeply into the meat itself.
- Extract the Vein: Once the dark string is exposed, use the tip of your knife or your fingers to gently lift it out. It might come out in one long piece, or in several smaller segments. Discard it into your shell bowl.
- Pro Tip: Sometimes, especially with smaller or very fresh shrimp, the vein might be barely visible or entirely empty. Don't worry! Still perform the shallow cut and give it a quick rinse. It's better to be thorough.
The Final Rinse
After peeling and deveining, give your shrimp a final rinse under a gentle stream of cold water in a colander. This washes away any lingering bits of shell, vein, or debris. Once rinsed, they are ready to be pat dry and used in your favorite recipe, whether it's marinating, grilling, sautéing, or adding to a stir-fry.
Pro Tips for Shrimp Success
To further enhance your shrimp prepping experience, consider these expert tips:
- Work Cold: Always work with cold shrimp. If they've been sitting out, they can become soft and harder to handle. Keep them on ice or chill them thoroughly before you begin.
- Create an Assembly Line: For larger quantities, set up an efficient workflow. First, remove all the heads. Then, peel all the shells. Finally, devein all the shrimp. This makes the process surprisingly fast and less tedious than doing each step one shrimp at a time.
- Save Those Shells! Don't throw away the shells and heads! They are packed with flavor and make an incredible seafood stock that can elevate risottos, bisques, and paellas. Simply simmer them with some aromatics (onion, celery, garlic) for 20-30 minutes, then strain.
- Practice Makes Perfect (and Faster): The first few shrimp might feel slow, but your speed and technique will improve dramatically with practice. Before you know it, you'll be zipping through a pound of shrimp in minutes.
- Consider Pre-Deveined (But Know the Trade-Offs): While learning how to peel and devein shrimp yourself is empowering and economical, there are times when pre-deveined (and sometimes pre-peeled) shrimp are a time-saver. Just be aware that they often come at a higher price point and might not be as fresh as whole, raw shrimp. For more insights on maximizing value, check out Stop Overspending: Your Easy Guide to Peeling and Deveining Shrimp.
Conclusion
You now possess the knowledge and confidence to conquer raw shrimp like a culinary pro! Peeling and deveining shrimp is a fundamental skill that opens up a world of fresh, delicious, and more affordable seafood possibilities in your kitchen. By taking these few extra minutes, you're not just preparing food; you're ensuring the best possible texture, flavor, and hygienic standard for your meals. So, next time you're at the grocery store, grab those whole shrimp, knowing you have all the tools and techniques to transform them into a masterpiece. Happy cooking!
